Okay, here is how to use the homemade "nail loom". Although I use 2 or 3 thickness of yarn together, as one, to make the squares thick and firm, I have taken the pictures using only a single thickness of variegated, worsted weight, acrylic yarn so that you can better see what I am doing. I recommend that you use only one thickness on your first, practise piece and then once you get the hang of the procedure you graduate to more strands for a fuller appearance in the final square.
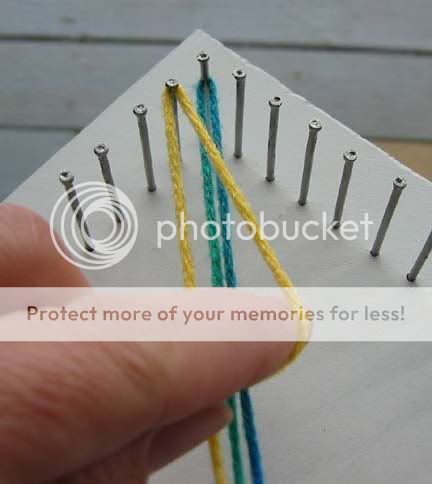
Start by turning the loom so that one corner is facing you. Place your yarn supply to your left. Tie the end of your yarn to the lower corner peg. I like to use a slip knot as it is easy to remove later.
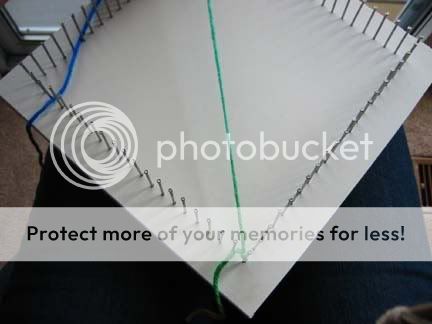
Drape your strand of yarn across the loom and around the opposite (top corner) peg, clockwise.
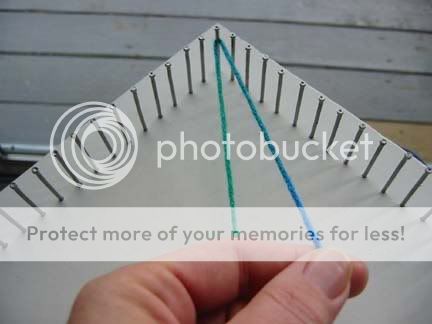
Bring it down to the lower corner again around the next empty nail to the right, and across to the next empty nail on the left ---
--- and back up to the upper corner you go.
After pivoting around the next empty nail at the top left hold it in that position ---
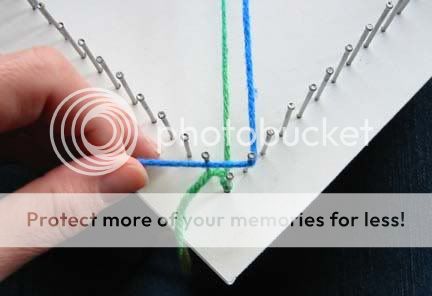
--- while you grab a large crochet hook and, going UNDER the middle strand on the loom, grab the working yarn ---
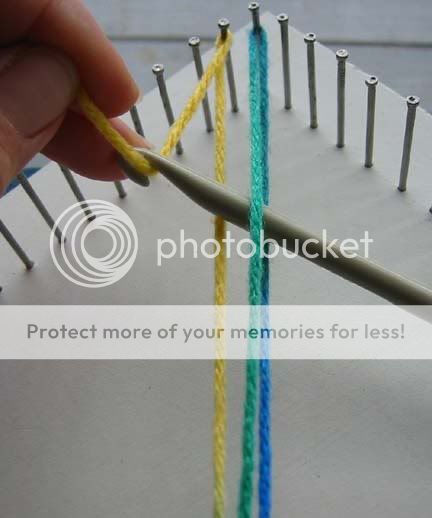
--- and forming a loop, drag it across to the next empty nail on the top right.
With that secured around the nail, take the lower half of the loop and pull it downward ---
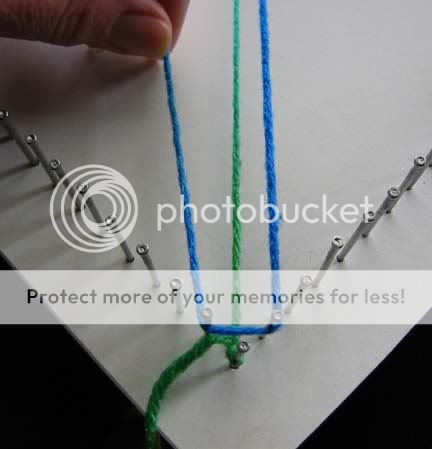
--- to the next empty nail on the lower right. As you snug this up you will see that the lower portion is already woven for you, thanks to the LOOP technique! Now it's just a matter of placing it around the first empty nail on the lower left, and you're heading back up to the top again.
Once again, pause after wrapping that empty nail on the top left, grab the hook and, weaving over and under (with this technique it works out that you ALWAYS start with an "OVER") ---
--- pull the loop through, wrap the next empty nail to the upper right, and drag the lower portion of the loop down to the next empty nail to the lower right.
--- with the lower portion already woven for you, wrap the lower left nail and proceed back to the top.
Back and forth you go filling the loom. When you get to a point where your crochet hook will no longer reach all the way across, do it in sections, holding the loop with your finger while you weave the hook in and out on the next section.
Continue repeating the steps until the loom is full and you have only the last nail on the left remaining unwrapped. Cut your yarn leaving a tail at least long enough to reach across the loom one more time ---
--- and then weave over and under with the hook and pull the final strand across and out the right hand corner.
Now, beginning at one corner, you can just pull up on your work, popping the loops off the nails.
Untie the beginning knot. All that is left is to weave in those beginning and ending tails.
My example square is all loosey-goosey and messy looking because it was done single stranded. Blocking would improve the look, but better yet, just use a thicker yarn or more strands ---
--- for a perfectly plump finished square.
These squares should be great for making blankets. All the squares are exactly the same size with exactly the same number of loops to sew into. Anyone who has ever had to put together a charity afghan, with it's various contributors making squares of unequal sizes and unequal numbers of rows, will appreciate the wonder of this uniformity!
Downloadable manuals for other loom types are available free from "Eloomanation".
Edited to add:
I've had a number of questions over the years about the dimensions of the homemade loom and the number of nails. Although I think these things can vary and you'll still have success, here are the measurements from my particular loom:
The nails on the loom span 20cm on each side, with 21 nails on each side (including the corner nails) for 80 nails total. The distance between the nails is 1cm. The board itself is 25cm square, providing a 2cm border all around. Each finishing nail rises about 3cm above the surface.
Any questions?
35 comments:
What an excellent tutorial! It's what I thought after your first posting, but you've made it even more clear. It's very tempting and what a great way to use up yarn. Thanks
Gillian
How totally cool! Thank you so much for the tutorial! :)
Great tutorial! I have one of the little looms for weaving squares that I found in a second hand store for a dollar many years ago and finally got around to doing some weaving on it last year - it is real easy and quick too. Now I would like to try the diagonal one too.
Arlie - your neighbor in Washington State
I love your tutorial, and seeing all the pictures. Marvelous! The loom itself reminds me of one I had when I was a kid. I had slightly stretchy fabric loops that I wove on the loom, and made a bunch of pot holders for Mom with it. :-)
Thank you! Thank you thank you thank you! I own HR looms but never tried using them.
i think i may just have to stop at home depot tomorrow and find some scrap lumber and finishing nails! my dad made me a knitting loom when i was 10 (and i still have it!) but this is a wee bit different. thank you!
either that, or i go find that metal loom i talked about earlier!
oh wow!! What a brilliant tutorial! Now I want to do that too!
I would definitely have shouted out earlier if I'd seen it, but as it is you beat me to it. Very cool. I didn't want one of those looms before, but (surprise, surprise) now I do. I'm thinking this would be great for Afghans for Afghans afghans!
Love it! I wish I had one of my own now to try it out.
Isn't that something! Impressive. I've not been spinning since my daughter was here...time to get back at it. Still playing catch up with laundry and trying to finish up the jewelry projects we worked on together.
I loved this tutorial you made. I'm an obsessed sock knitter but as a child, I did the pot holders with the loops. For us handy people, would you be inclined to share measurements or details of your loom? Some of us could just make one for our own use. I loved that very colorful yarn in the tutorial also. Thanks for sharing it with us.
I can see using an afghan hook or a cro-hook instead of a regular crochet hook. One of those types of hooks would be long enough to weave the whole row. Thanx for the tutorial!
Actually Tracy, I've tried one of those and it didn't work as well. To get all the way across the row you end up "low on the horizon" so to speak. The extra length of the afghan hook ends up in the way.
Fantastic description with wonderful pictures! You picked a wonderful yarn that made it easy to see what you were doing. Thank you so much!
I also thought of the afghan hook but didn't understand what you meant in your reply to Tracy. Could you explain more?
Just FYI, I wandered over here from a link you provided on the small_looms list.
Thanks again! ~Becky~
Sure Becky, I'll try to be a little clearer.
To get all the way across the longer rows with an afghan hook you end up with the hook in a totally horizontal postion, flat against the weaving. Because of the extra length of the afghan hook, the butt end gets hung up in the nails on the opposite side of the loom. When you use an ordinary length crochet hook and only do partial rows the hook doesn't have to be held so low. The angle can be different and you don't run into the problems with the back of the hook getting caught up in the nails.
I'm so excited! My dad is in the process of making me a loom, but I wasn't completely clear on how to weave on it. I figured I would bumble along once I had it in my hot little hands. Now I'm all set - great photos and directions. Thanks so much!
Thanks for this tutorial. I just bought a 4" loom, and I couldn't figure out how to do a diagonal weaving from the written instructions that came with it... now I know how! Thanks again.
I was typing out a big thanks for blog and the great loom tutorial. But guess what, my computer are it I think. Enjoyed the related links and the history. You are a very talented and amazing person! Thanks again for sharing your knowledge, passion and enthusiasm, seemingly, for everything you do.
how do you use more than strand of yarn?
Anonymous, just hold the multiple strands together as though they are one thicker yarn, and work with them "as one".
fantastico
mipiace tanto
silvana
Thanks for the tutorial, I don't have a loom myself but I found that if you put push pins on a cork board or stiff enough cardboard spaced out evenly in a square it works just as well, just have to make sure the push pins are secure enough to hold and not fall out as you're working.
OK I get the drift pretty good now after the tutorial. I made the board(s) like last September, and have two at my sons house. Unfortunately the 5 year old was not too interested, but a bit. I would say the cotton yarn a big failure, but will try some fat yarn. Was hoping to make a surprise coaster for the mom, made partly by the kids. Will keep you posted on how project number two works out! CB
Enjoy and remember: if you have to frog, so what!
Frogging is a wonderful way to learn.
Never making a mistake is a prelude to never learning how to do even more extraordinary designs.
This is wonderful, so excited to try it. Thank you for taking the time:)
Very beautiful and I have been inspired to try !
Eu Aprendi muito detalhes importantes prá iniciante. Muito obrigada por compartilhar Seu talento !!! Quissamã RJ Brasil
For those who don't speak Portuguese I was able to get a translation from Babelfish.com. angela lima said, "I learned a lot of details important to a beginner. Thank you so much for sharing your talent! Quissamã RJ Brazil"
You are very welcome Angela. Thank you for dropping by my blog.
Você é muito bem-vindo Angela. Obrigado pela visita meu blog.
I finally got a little loom to try this, & aside from some waviness caused by my uneven tension, it came out great. Thank you so much for your perfect tutorial!
I managed it on a little Weave-It, with that odd pin spacing. So you're right: "these things can vary and you'll still have success"!
Thank you for the excellent tutorial!
I need to bring the drill press into the house and make one of these. What was the thickness of board and what size nails did you use?
I bought the nail loom from a vendor at a Fibrefestival years ago. I did not make it myself, though it is handmade.
Okay your explanations and pictures are wonderful but... why do I consistently end up with 3 sides looking great and the 4th side showing looseey goosey loops all the way across? I am missing something
It is nice but ...can u please precisely explain through video
No, unknown. As you can see this tutorial was compiled in 2007, over 11 years ago! I do not have the time now, nor the inclination to make a video tutorial on this technique when the photos and description describe the process very well.
Post a Comment