Translate

Showing posts with label nail loom. Show all posts

Sunday, September 23, 2007

Hours of Knitting and Nothing To Show

Needing a bit of a break from all the Christmas stocking applique, I started on the Honey Bee Stole. I worked on it for a couple of hours last night and got almost a full repeat of the first section done --- before deciding the gauge was not working and it would be too big. So I ripped.

Today I started in again, this time with needles two sizes smaller. It was looking much better and, several hours later, I was nearly back to where I ripped last night. Then the phone rang and I put the work down mid-row. *cue ominous music*

Photo Sharing and Video Hosting at Photobucket

These very simple blanket squares woven on a nail loom are how I got over the frustration and despair of losing all the work once again, when I somehow messed up after answering the phone mid-row.

Friday, May 25, 2007

Nail Loom Dimensions

"Lily's Mom" asked the measurements of my nail loom.

Photo Sharing and Video Hosting at Photobucket


Jim, of Oyama Lake Alpaca Farm, made the loom using a square of white shelving and some finishing nails. The outside dimensions of the wooden square are 25cm x 25cm (9 3/4" square). The nails themselves form a 20cm square (8") and are 2.7cm from the edges (1"). There are 21 nails per side (including the shared corners) for 80 nails total. I have no idea how long the nails were, but 3cm (1 3/16") is above the surface and they aren't at all wobbly. There is 1cm (3/8") space between each nail.

Given the stretchy nature of most yarn, the square "shrinks" a little when it comes off the loom. Depending on the elastisity of the yarn used, my squares end up being 7 1/4" - 7 1/2" when finished.

How to use it: Here

Saturday, May 19, 2007

Nail Loom Tutorial

Due to Photobucket's change in policy that requires high fees for using their service, (which originally was free), my original post of this tutorial no longer has its photos visible. Try going WAY back using this "way back machine" link.  Sorry for the inconvenience.


Okay, here is how to use the homemade "nail loom". Although I use 2 or 3 thickness of yarn together, as one, to make the squares thick and firm, I have taken the pictures using only a single thickness of variegated, worsted weight, acrylic yarn so that you can better see what I am doing. I recommend that you use only one thickness on your first, practise piece and then once you get the hang of the procedure you graduate to more strands for a fuller appearance in the final square.

Start by turning the loom so that one corner is facing you. Place your yarn supply to your left. Tie the end of your yarn to the lower corner peg. I like to use a slip knot as it is easy to remove later.
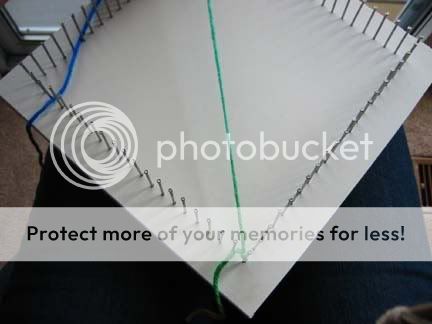
Photo Sharing and Video Hosting at Photobucket

Drape your strand of yarn across the loom and around the opposite (top corner) peg, clockwise.
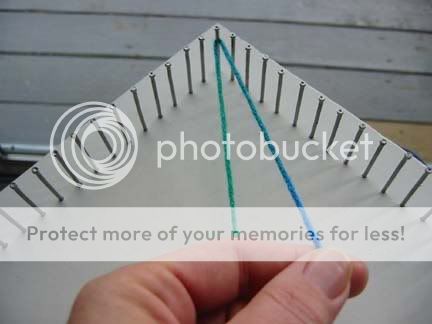
Photo Sharing and Video Hosting at Photobucket

Bring it down to the lower corner again around the next empty nail to the right, and across to the next empty nail on the left ---
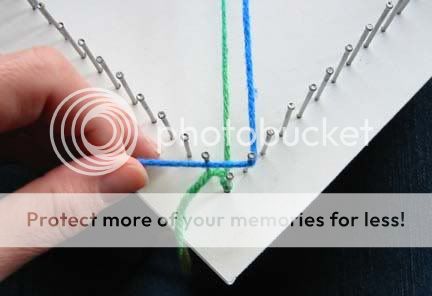
Photo Sharing and Video Hosting at Photobucket

--- and back up to the upper corner you go.
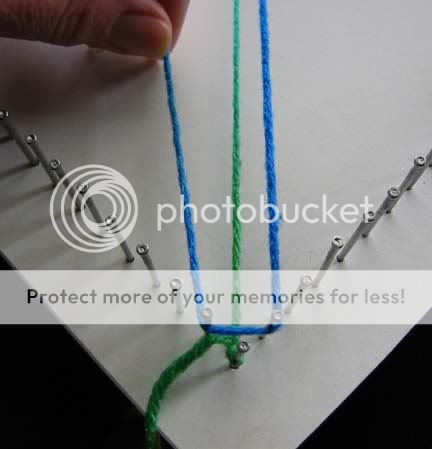
Photo Sharing and Video Hosting at Photobucket

After pivoting around the next empty nail at the top left hold it in that position ---
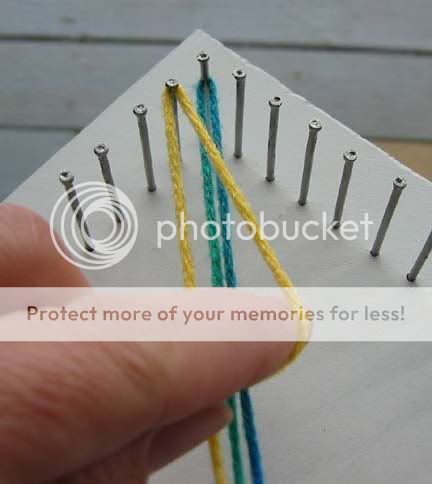
Photo Sharing and Video Hosting at Photobucket

--- while you grab a large crochet hook and, going UNDER the middle strand on the loom, grab the working yarn ---
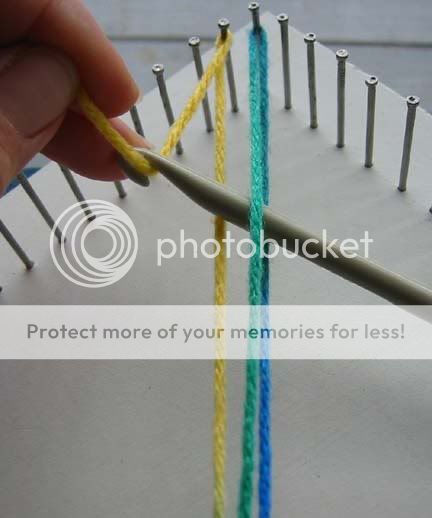
Photo Sharing and Video Hosting at Photobucket

--- and forming a loop, drag it across to the next empty nail on the top right.


With that secured around the nail, take the lower half of the loop and pull it downward ---


--- to the next empty nail on the lower right. As you snug this up you will see that the lower portion is already woven for you, thanks to the LOOP technique! Now it's just a matter of placing it around the first empty nail on the lower left, and you're heading back up to the top again.


Once again, pause after wrapping that empty nail on the top left, grab the hook and, weaving over and under (with this technique it works out that you ALWAYS start with an "OVER") ---


--- pull the loop through, wrap the next empty nail to the upper right, and drag the lower portion of the loop down to the next empty nail to the lower right.


--- with the lower portion already woven for you, wrap the lower left nail and proceed back to the top.


Back and forth you go filling the loom. When you get to a point where your crochet hook will no longer reach all the way across, do it in sections, holding the loop with your finger while you weave the hook in and out on the next section.


Continue repeating the steps until the loom is full and you have only the last nail on the left remaining unwrapped. Cut your yarn leaving a tail at least long enough to reach across the loom one more time ---


--- and then weave over and under with the hook and pull the final strand across and out the right hand corner.


Now, beginning at one corner, you can just pull up on your work, popping the loops off the nails.


Untie the beginning knot. All that is left is to weave in those beginning and ending tails.


My example square is all loosey-goosey and messy looking because it was done single stranded. Blocking would improve the look, but better yet, just use a thicker yarn or more strands ---


--- for a perfectly plump finished square.


These squares should be great for making blankets. All the squares are exactly the same size with exactly the same number of loops to sew into. Anyone who has ever had to put together a charity afghan, with it's various contributors making squares of unequal sizes and unequal numbers of rows, will appreciate the wonder of this uniformity!

Downloadable manuals for other loom types are available free from "Eloomanation".

Edited to add:
I've had a number of questions over the years about the dimensions of the homemade loom and the number of nails. Although I think these things can vary and you'll still have success, here are the measurements from my particular loom:

The nails on the loom span 20cm on each side, with 21 nails on each side (including the corner nails) for 80 nails total. The distance between the nails is 1cm. The board itself is 25cm square, providing a 2cm border all around. Each finishing nail rises about 3cm above the surface.

Any questions?

More About The Small Loom

Responding to a question from Leisel.

This isn't a Weavette although it is similar. It is just a board with finishing nails hammered in at regular intervals. It was made by the owners of Oyama Lake Alpaca Farm. Darlene Homenchuk and her husband were doing a small demo at Fibrefest. Only 4 of the looms were made. With the loom she provided a single sheet photocopy as instructions. No pictures, just text. If I hadn't had the demo I doubt that I could have figured it out from the instructions, although it is VERY simple to use.

I've seen the Weavette instructions here. The instructions for that are WAY more complicated than the diagonal weaving instructions I use. The little loom I have is used in the same manner as the Hazel Rose Loom. The company that makes the Hazel Rose Loom provides an instruction booklet with their product. I haven't seen it, but they mention it on their site.

The cool thing about weaving diagonally is that it is accomplished by pulling a LOOP of yarn across the loom each time. Going over and under the "warp" threads with a crochet hook, you then pull across a loop. One side of the loop ends up weaving the top corner, and the other side is pulled down and fills in the bottom corner --- without you having to go over and under again. You accomplish twice as much weaving in half the time! Also, with this little loom you fill it ONCE and you are done. It doesn't require several layers of weaving like the Weavette.

Photo Sharing and Video Hosting at Photobucket

This is a simple little loom with a very simple, but fast and effective weaving technique. The technique does require that there be a nail in each corner, which I think is absent in the Weavette? With some precise nailing, it would be very easy to make a loom like this. If you're more likely to hammer your thumb than one of the many nails necessary, Hazel Rose Looms makes beautifully finished looms in a variety of sizes.

If there is enough interest I could do a photo essay of how to weave on a simple homemade "Nail Loom". Sing out in the comments if you are interested.