When I was about 12 or so my maternal grandmother attempted to teach me tatting with a shuttle. After an afternoon of me creating nothing but immovable knots we both gave up in frustration. Fast forward 45 years and something finally "clicked" and I got it! I credit the wonders YouTube and modern technology for finally bringing
instruction that I could watch over and over until I understood that oh so important "magic trick" for flipping the stitches. It's the very first thing you have to learn and it is the stumbling block that prevents many beginners from ever going any further.
Perhaps you are wondering whatever made me try again, so many decades later? Chalk it up to not being able to pass up a freebie. Dover publications offered to send a new publication, "
Tatting with Anne Orr", free of charge, in hopes that I would do a book review. I don't accept all such offers, only the ones that interest me and might interest my blog readers. This one interested me since I inherited my grandmother's bone tatting shuttle.
The publication arrived and looked great, but I couldn't find Grandma's shuttle! I had promised to do the review though so I borrowed a shuttle. Within a day I was addicted and ordered
a pack of plastic Clover brand shuttles of my own.
How was the book? It's a great pattern book, but not one to learn by. Really, to learn tatting you really need either one on one instruction or a series of great videos like I linked to above. Once you learn tatting though, this is a wonderful book containing over 50 edgings, 40 medallions, collars and yokes, doilies and more.
I've started a little reference file for myself by making 3x5 sample cards. The intent is to eventually do a 5" sample of all 50 edgings.
Not all of the edging instructions are perfect though. This one needs adjusting or,
worked as written, it curves into a medallion rather than forming a straight edging as pictured in the book. I have found that several of the edgings have been photographed face down too, so that the photograph is going in the opposite direction to what you will be working. Very confusing!
The other book in the photo, "
New Tatting", by Tomoko Morimoto, is one that I purchased. It's got great, clear instructional photos, including help with that infamous "flip" that is so important. I'm not impressed though with the admonition to finish off by GLUING the ends! Seems sacrilege to me! Grandma would have been appalled. I'll continue to neatly and invisibly sew the ends in thank you very much.
Once I had the basics down I wanted to try patterns that had more advanced techniques Some required learning split rings. Seemed daunting at first, but once again with those YouTube videos I was able to figure them out.
The next challenge was to learn to add beads. The video I watched mentioned using "strivers" made of paperclips to hold the beaded picots in position for later joining.
It took some wise advice from a Ravelry forum member to clue me in that I didn't need to leave the strivers in place. They are just needed until the picot is measured accurately, then can be removed. D'oh. Well, working without all those dangling paperclips sure makes it easier!
Now that I'm addicted to yet another fibre related hobby I, of course, craved some quality equipment. Luckily this hobby does not require nearly the expense or storage space of my weaving addiction.

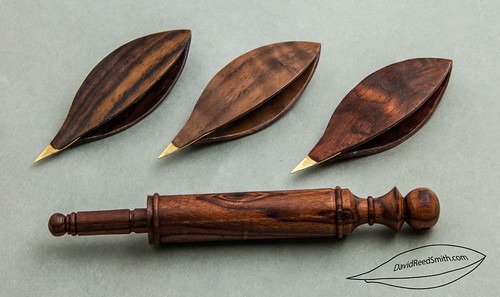
I ordered these handmade beauties from
David Reed Smith. They are, from left to right, 2.25" brass tipped shuttles in East Indian Rosewood, Figured Walnut, and Pommele Bubinga. The device at the bottom is a "reversible hook" in Kingwood.
I SO love having quality handmade tools. These are FANTASTIC!!
PS: All links are provided for your convenience. I receive no compensation for your "clicks".

