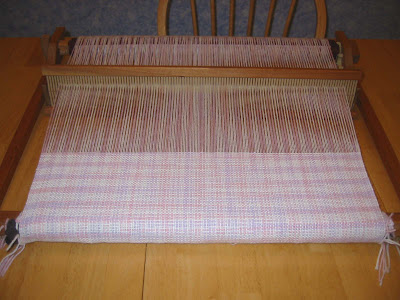
I purchased Betty Lynn Davenport's revised book, "Textures and Patterns for the Rigid Heddle" and have been exploring some of the learning experiments.
My first 11 samples are done in worsted weight wool with the 8 dpi heddle. The first 10 are experiments with creating varying lengths of floats using a pick up stick.
Before reading through the instructions in the book I never realized how EASY it is to weave using a pick up stick. I always thought that for every row a pick up stick was used you had to go across picking up all those threads each and every time. NOT SO. For the first 10 samples I picked up the warp threads ONCE. The pick up stick is then left resting, in place, behind the heddle until it is used again.
For the last sample, a 3/1 lace, it required a different pattern of threads picked up, but after picking them up once I was able to weave it off, just bringing the pick up stick forward when needed. Fantastic! I love my little rigid heddle loom.
A fiber-crafts fanatic who lives to create. I'm also "Wovenflame" on Ravelry, Flickr, ETSY, DoA and yahoogroups.
Translate
Tuesday, May 27, 2008
Monday, May 26, 2008
Masters Monday - 2.19
I've finished the back of the Masters Level II vest, and I'm working on the left front piece.
It's up to the neckline shaping and underarm now. The way I have the neckline shaping written out doesn't look as good as I thought it would so I have paused for a bit while I consider the alternatives.
As I show this as a work in progress keep in mind that these pieces are not blocked. Hopefully any irregularities will be reduced in the blocking.
Monday, May 19, 2008
Masters Monday - 2.18
Just when you thought I had been reduced to a crawl with the TKGA Master Knitter program, I rallied this week with a sudden burst of speed.
Frustrated with last week's yarn purchase I did some checking and returned to my original yarn choice for the Masters Level II vest. I had abandoned it before, thinking that it was too thick for the program's requirement of double knitting to worsted weight yarn. I considered the yarn I had to be more like an Aran weight. I went back and double checked the TKGA directions and then went to the Yarn Standards website and discovered that there are two weight classes that are considered to be "worsted weight". The one I normally associate with worsted weight is actually "#3, DK Light Worsted", but there is a second category "#4, Worsted, Afghan, Aran" and I am well within the stitch gauge range for the #4 class. The definitions at the Yarn Standards website are accepted by TKGA so this yarn will be fine.
The yarn still doesn't work for my selected pattern though so I had more than a little additional work ahead of me. First off I had to do a large amount of sampling. I started with the attempt to find a nice gauge for this yarn. On the left in the above picture I started with small needles and worked my way up (the swatch is actually upside down....the pattern stitch section should be at the top) to larger needles until I found a gauge that gave good stitch formation and the required fluidity in the knitted fabric. I then made sure that needle size also looked good in the pattern stitch.
The second rather sloppy looking swatch is a variety of tests I needed to make before rewriting the pattern to suit the yarn. I checked that the yarn looked okay for my planned tubular cast on and that I was able to neatly seam tubular cast on. I also experimented with various selvedge treatments and with moving the stitch repeat to different sections to find my best seaming options. These swatches are for my own benefit and don't have to be handed in so I placed some seams on one side and some on the other because I was also checking to see which side of the pattern stitch I liked best.
Then I came to my next hurdle when I wound the skeins into balls.
This WAS 5 skeins of yarn. EVERY single skein had at least 3 knots.....meaning for each skein I ended up with 4 mini balls rather than the one large, 4 ounce ball I expected. Some of the knots were only a few inches apart! VERY unacceptable. I will be writing a letter of complaint.
Despite fears that I may run out of yarn (all those extra yarn joins are going to really eat up the yardage) I have decided to get started. What I can't show here is all the hours I spent rewriting my chosen pattern to reflect my change in gauge, centering of the pattern, cast on, and personal sizing. My new custom pattern is a reflection of the design elements in the original pattern reworked with Sweater Wizard software, and then copied into a word program where I redid and expanded upon the wording for clarity.
Monday, May 12, 2008
Masters Monday - 2.17
I thought this yarn would work. The gauge was right. The colour was right. The price was right. But the feel......~~shudder~~.....how did I overlook the feel of the stuff? In the store I managed to convince myself that the feel was "rustic", perfect for the casual vest I have in mind. After getting the yarn home, washing it, (yup, I washed it....not returnable now!), and knitting up a swatch I realized that knitting with this stuff would be like spending hours and hours (many days actually) scraping my fingernails down a chalkboard. The feel of this "Briggs and Little, Regal" running through my fingers makes me cringe. While I wouldn't say it's actually scratchy, it feels dry and ...... raspy?
I could cringe and bear it and suffer through the knitting if I thought it would otherwise work up nicely for the vest, but look at those stitches! Horrid. They don't nestle into each other nicely or plump up. No "bounce". The knitting has uneven gaps and misshapen stitches. It looks about as lovely as knitted twine. Ugh. Must find something else.
This crud will be set aside for a weaving, most likely something that will be fulled or felted. At least with weaving you don't have to actually touch the stuff as much as you do with knitting!
Wednesday, May 07, 2008
Excuses
Okay, okay. So this photo of an old, old finished project (the wall quilt is almost 20 years old!) Is just an excuse to get my cute little granddaughter's photo on my blog.
And speaking of excuses, a quick comment about the recent lack of Masters Monday posts.
- I've been very busy organizing a knitter's group in my area.
- I HAVE done a bit of work on the requirements each week but it hasn't been knitting or worthy of a photo.....(answering questions, researching techniques).
- I've had a migraine headache on both of the missed Masters Mondays (no, really!)
- I've been sidetracked trying to finish a sweater I shouldn't have started in the first place.
Sunday, May 04, 2008
In The Beginning
Woo Hooo! The first meeting of ..... um .... um .... well we didn't actually take a final vote on a name or anything so I'll just call the group the Upper Fraser Valley Knitting Group for now and shuffle through the questionnaire again in search of what the alternatives were so we can make a final decision.
Now. As I was saying. The first meeting of the Upper Fraser Valley Knitting Group was a great success. 17 knitters in attendance. Much enthusiasm and friendship and a whole lot of knitting going on. Plans are in the works to meet locally for WWKIP day, (World Wide Knit In Public Day), on Saturday, June 14.
I brought my camera to the meeting, got permission from all but one of the participants to occasionally post photos of the group on my blog, and then wouldn't you know it.....I forgot to take pictures! The inaugural meeting and I didn't get a single picture. BAH. We will need a group photographer I think.
Thursday, May 01, 2008
Fine Tuning
I've made a few small revisions to the way I warp my rigid heddle loom. First, for wider warps I'm now using 3 pegs for the continuous warping.
I had my husband secure the pegs into a board which I can then attach with C-clamps to my warping table (an old door he uses as a work bench). Using 3 pegs seems to make for a more even warp while at the same time eliminating the pile up of warp threads that happens when trying to put them all on only one peg.
For this stage of the warping (beaming the warp), I've done away with the heddle blocks and I just clamp the heddle securely with strong clamps.
Then I turned the C-clamps sideways on the board for added weight and let it drag along the table as resistance as I wound on the warp. I liked having the warp ends still looped around the pegs. It really helped to keep things even. At the bottom of this picture you can just see the burgundy coloured vinyl venetian blind slats I use as warp spacers.
Subscribe to:
Posts (Atom)